quince cheese (Dulce de membrillo), basic recipe no 2

Quitten_01Here we are for part 2 of the quince basic recipes. Assuming you have already cooked your quince fruit and want to use them for the quince cheese, we start directly. If you have raw uncooked quince fruit, please read the post about the quince jelly and use the fruit pieces you do not need for this recipe.

Ingredients

  • cooked quince pieces
  • sugar

First you have to strain (pass?) the quince pieces, to get a fine pulp. I use my Kitchen Aid with the strainer attachment, but you use, whatever you have. A stainless steel strainer should do the job. And you will have a nice arm workout while passing the quince through the strainer.
Now weigh the pulp and mix thoroughly with the same amount of sugar. Put everything in a non-reactive pot on the stove and heat up. Do this quite cautious, because of the great amount of sugar the pulp will burn quite fast.
Let simmer for about an hour, stirring as often as possible. But be careful, because the mass will act like lava and bubble and  burns like hell, when you get hit.
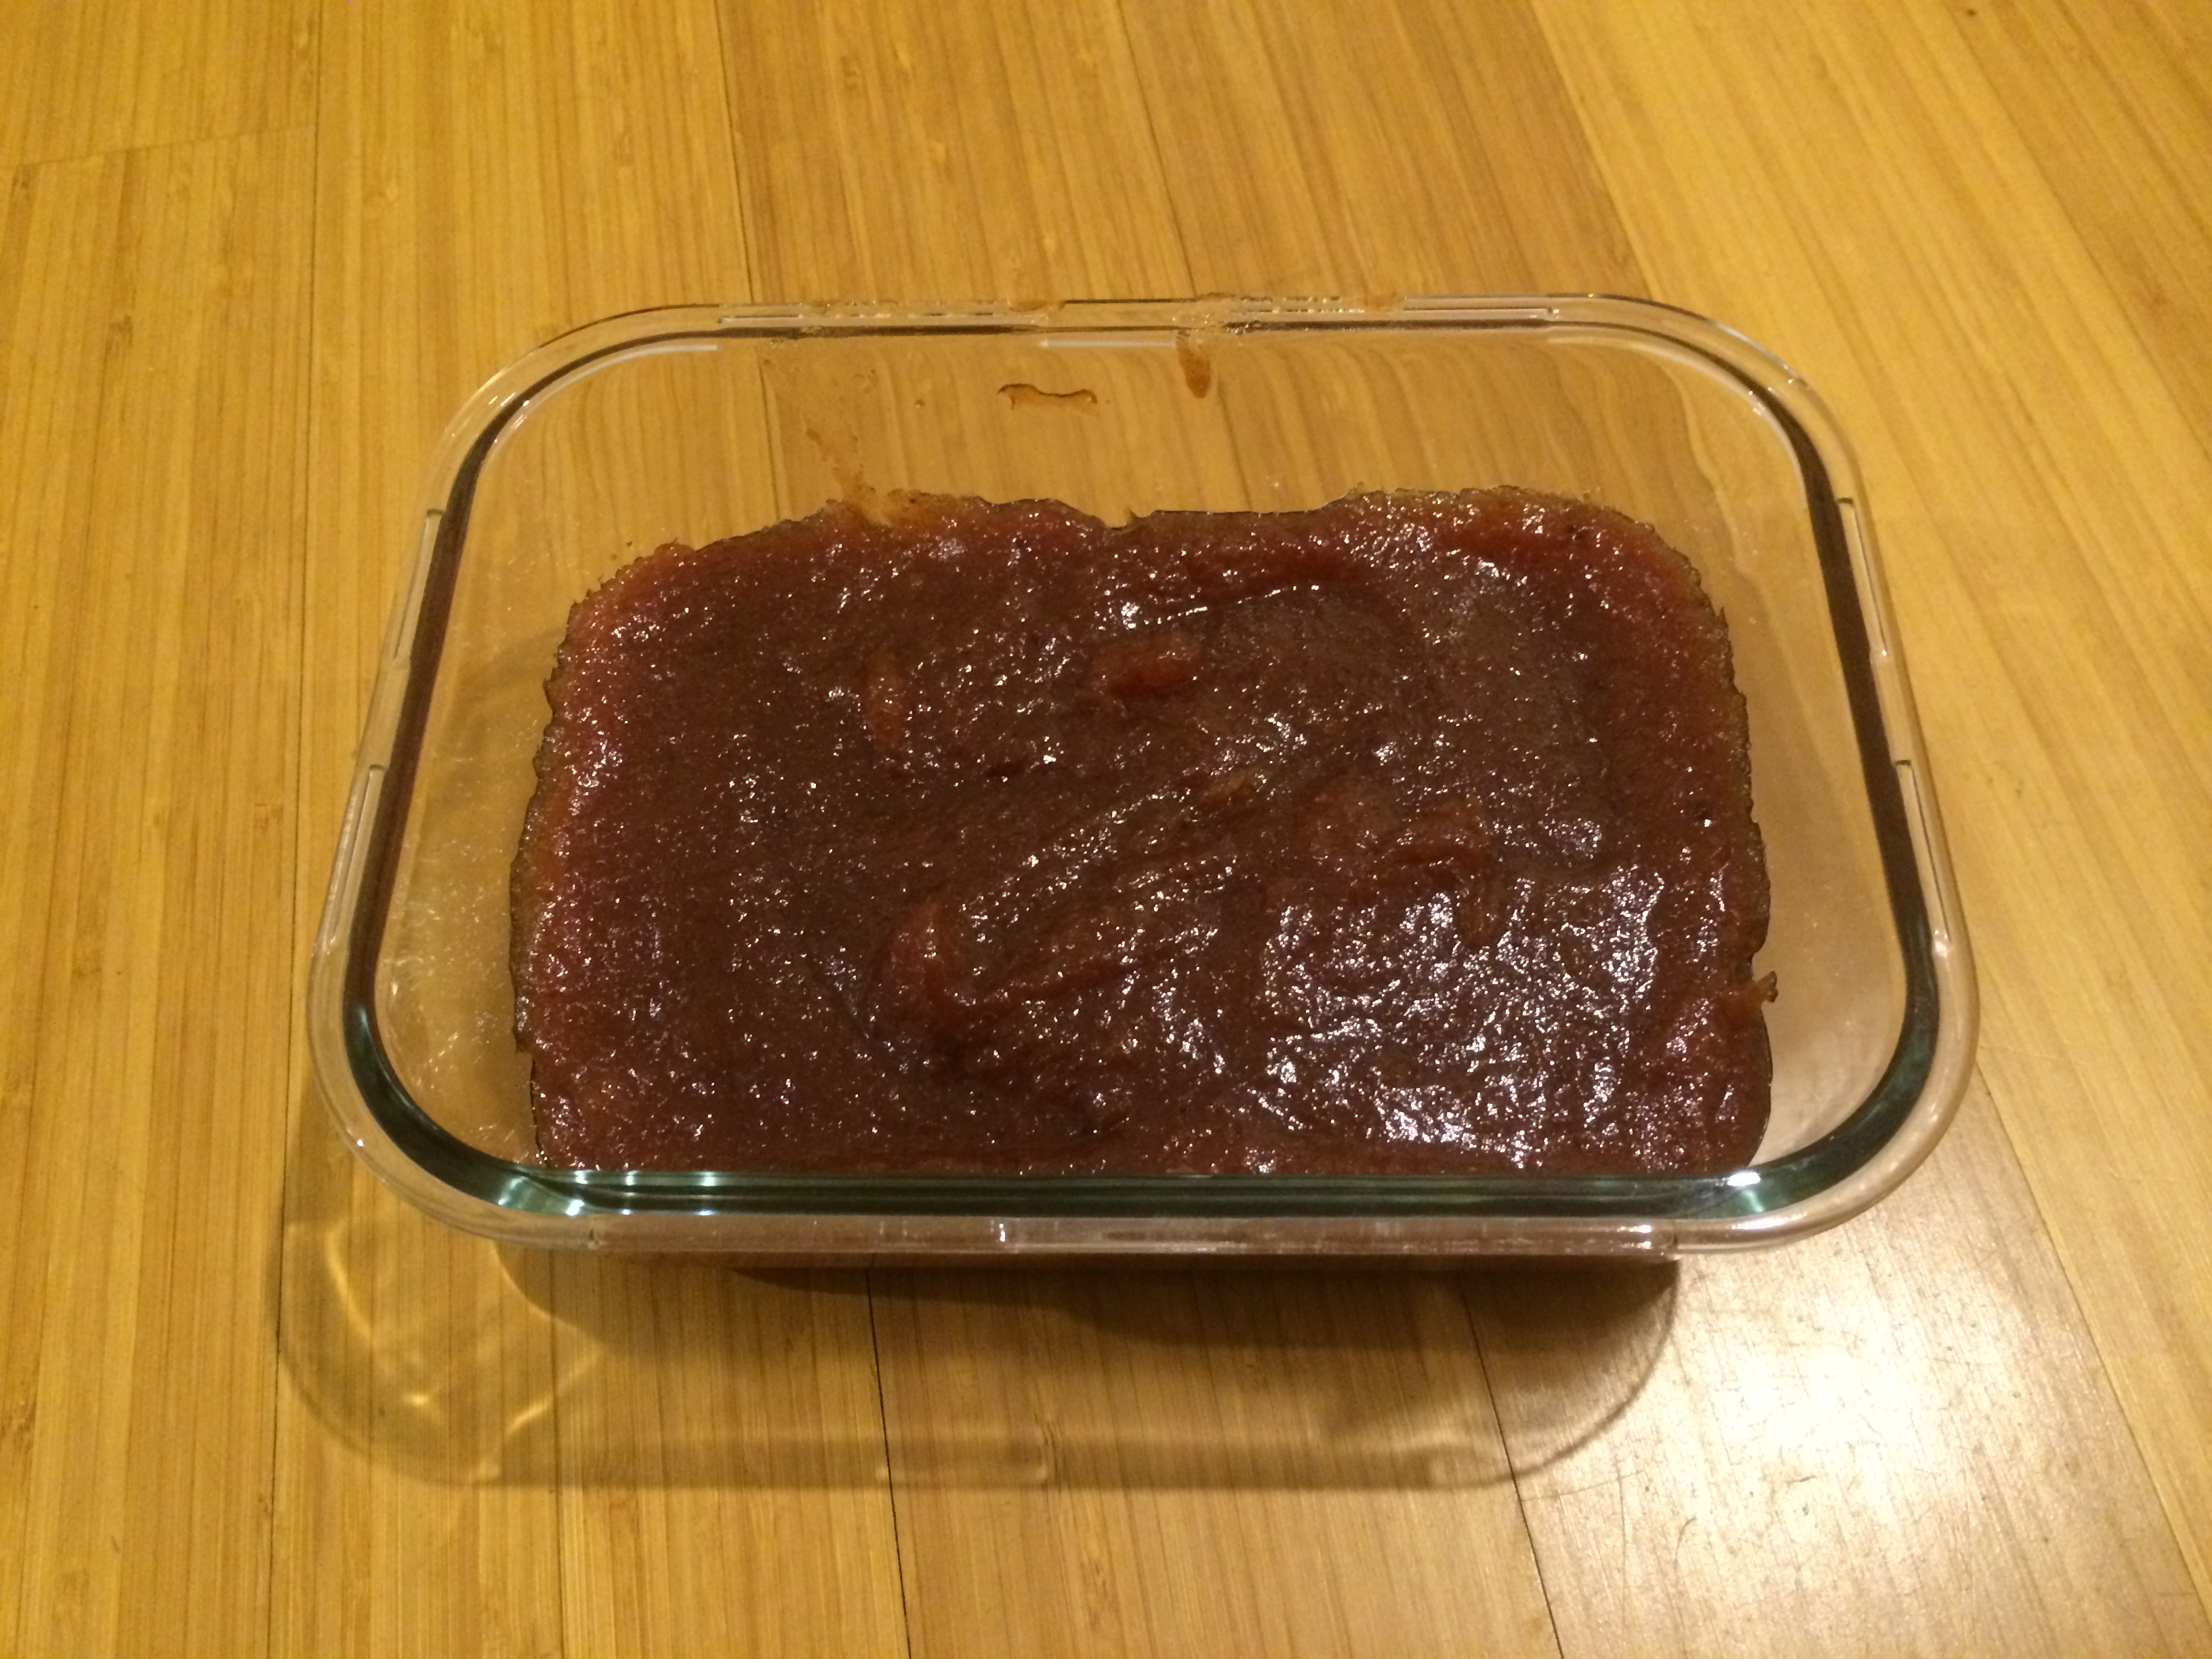
You know, that the quince cheese has cooked enough, when it has thickend and starts to come off the walls of your pot. This may take more than one hour.
Prepare a heat proof container, like a glass baking dish, that you won’t need for some time. Pour the hot quince paste in the container and spread out evenly. Let cool, and cover with baking paper or sandwich paper and store ideally somewhere nice and warm, like close to your heating or in your boiler room. I guess you can also store it in a dry cupboard. Leave it there for about one week or maybe longer. The time the quince cheese needs to set depends on the amount of time you cooked it, as well as on how thick it is in the container.
To check, if it’s ready, you can pull a little bit on the edges, if it comes off the walls easy and has a completely firm jelly-like texture, it is ready to eat. Don’t be irritated if it hasn’t set after a week. I usually let it stand for 3 weeks, because it keeps forever. In my fridge is still some quince cheese from last year, tasting perfectly well.

Enjoy with cheese, like jam on bread or use it in your pastries.

quittenbrot


Quince Jelly (with raspberries), basic recipe no 1

Quitten_01

I love quince, they smell great, they look very nice, and they are one of the rare things you can only get, when they are in season.
This is why I am going to have a quince-special here on my blog!

One of the first things I did, when I got my garden, was to plant a quince tree. So my quince fruits are in season now, and I am having a hard time to use them fast enough, before they go off.
This is one minor problem wih quince, you always have to cook them, you can’t eat them raw.

First thing I do when the quince fruits are ripe, I cook quince jelly and with the remaining fruit pulp, I make quince cheese (dulce de membrillo). This is a natural pairing, because for the jelly you only need the juice and I could never bear it to throw away the complete fruit pieces, so I use them for the quince cheese.

Ingredients

  • 5–6 quince fruits
  • raspberries (optional)
  • water
  • jam sugar 2:1 (gelling sugar)
  • lemon juice or citric acid

The exact amounts of water, sugar and the rest depend on the quantity of juice you get after cooking the quince, so I cannot give you more details in the ingredients list.
First you have to rub the fuzz off hte quince, I usually do this over the sink, simply by using my hands. But you can also use a kitchen towel. Then wash them thoroughly.
Now comes the heavx part: cut the quince fruits in about 2–2,5 cm pieces. Use the biggest, sharpest knife you can find in your kitchen, but please be careful with your fingers. The quince fruits are very hard, and you may need to use a lot of weight on the knife to cut then. Do not remove any pits or the skin. They help with the gelling process later.
Quitten_02Put everythin in a big, non-reactive pot (stainless steel or enamel), cover with water and bring to a boil.
As soon as everything starts to boil, I reduce the heat to minimum and let them simmer for about 20 min. This should be enough to soften the quince and release their juices to the water.

To cook jelly, you usually need cold juice, so just leave the pot with everything on the stove to cool down and proceed the following day or whenever it is cool enough.

To start with the jelly strain the quince pieces through a fine mesh colander, but keep the juice, because this is, what we need first. Put the quince pieces in a plastic container in the fridge and leave it there until you got enough time to cook the quince cheese. Or maybe you already have other plans for them? They will keep for about one week.

Quitten_03Measure your cold quince juice and put it in a non-reactive pot. If you want to use raspberries as well, weigh them and put them in the pot as well. For jelly you have to use a bit more than 50% of the weight of your juice, usually it is 700 ml juice and 500g jam sugar 2:1. Also add the amount you need for your raspberries.
If you have a lemon at hand or some citric acid, you can add it too. I think, this is not necessary to taste better, but it keeps the colour fresh :-)

Mix very well with a wooden spoon and bring to a boil. As soon as it boils reduce to a simmer and let cook for a minimum of 4 minutes.

Prepare your glasses and fill with the jelly as soon as it is ready. Fill the glasses up to the rim, but make sure to keep the rim clean. Close the glasses and turn them bottom up,  allow to stand for at least 10 minutes.

Quitten_04

Semi-dried tomatoes

I really love dried tomatoes!
And whenever I get the chance to make them myself, I am thrilled.
This year I had plenty of cherry tomatoes and an even smaller variety called „Gelbe Johannisbeere“ (translates as yellow currant). They are really the size of red currants, only in bright yellow, and they taste like tomatoes.

When making dried tomatoes, I find it quite difficult to catch the right moment, before the tomatoes are too dried out.
So this time I made only semi-dried tomatoes. Which means, they are already more intensive in the flavor and sweeter, but you still have to keep them in the fridge.

This is what I did:

Ingredients

  • 500 g cherry tomatoes or other small varieties (or enough to fit on your baking tray)
  • 2 Tbsp olive oil
  • 3-4 sprigs of thyme, leaves picked
  • pepper & fleur de sel or malodon salt cristals

TomatenFirst preheat your oven to 100°C.
Then wash and pat your tomatoes and the thyme dry.
Cut the tomatoes in half and put them on a baking tray, cut side up.
As you can see on my photograph, I used a tarte pan, because I didn’t have enough tomatoes to cover a big baking tray.
Now sprinkle with the thyme leaves, pepper and salt and drizzle the oil over the tomatoes.

Put the tray in the oven and let cook for at least 3 hours.
I usually turn off the heat after three hours and let the tomatoes sit in the oven until the next morning.
If you think they need some more time, just turn on the oven again, or after the three hours, let them cook longer.

They should be nicely dried on the cut side but still moist in the center.

semi-dried tomatoes

rosmarin oven fries

First I thought there is no need to add this recipe here, because everybody knows these potatoes anyway. But while reading a cookbook, I realised, there are also so many recipes in there, I thought everyone knew. So I decided to post my rosmarin oven fries today.

This is my version of the classic rosmarin oven potatoes.
They changed into fries, while cooking them a couple of times with friends (thanks, Patty) and are now crispier and faster cooked through.

Ingredients

  • 6–7 big potatoes, if you use medium potatoes use some more
  • a 15cm sprig rosmarin, leaves picked
  • olive oil
  • salt & pepper

Rosmarin KartoffelnPreheat the oven to 190–200°C.
Thoroughly wash the potatoes and cut away all the dark spots.
Depending on the size of your potato, cut it in 1 cm thick slices and again in 1 cm thick sticks.
Now all you have to do is, place them on a baking sheet, season generously with salt and pepper, add the rosmarin, drizzle with the olive oil and mix very well with your hands. Make sure that all potato chips are coated with the seasoned oil. Now put the baking sheet in the oven and let cook for about 20 min. Using a spatula turn over everything, and cook again for at least 10 min, maybe you need to toss the chips once again. I like them quite dark and crispy, that takes about 40 min.

Rosmarin Backofen Pommes


Turmeric-melon-coconut Shake

Two weeks ago, I made this incredibly good turmeric almond milk from Healthful Pursuit.
I used fresh turmeric instead of the powdered stuff and the flavour was unexpected fruity. I don’t know if that was because of the fresh turmeric or if it would have tasted the same with the dried turmeric powder. But I liked that. A lot!
And that’s why I thought this morning, that the turmeric (there is still a fresh piece in my fridge …) might taste very good paired with melon. And with a charentais melon waiting in my fridge as well, I changed the recipe to a very delicious, exotic milkshake.

Zutaten

  • 5ooml coconut-rice milk (or rice-coconut milk :-) )
  • 1–2 cm fresh turmeric, peeled
  • 1/2 charentais melon, deseeded and flesh scooped out (I guess any honeydew melon will do)
  • 1/2-1 tsp cinnamon
  • 8 stoned dates
  • 4–5 ice cubes (optional)

Simply staple everything in your blender. If the dates are quite dry, it might help to soak them for some minutes in the milk. Blitz until everything is smooth.
Divide between 4 small glasses (0,2l) or 2 larger ones (0,4l).

Kurkuma-Melonen-Kokosnuss-Shake

french green bean salad

Today I am enjoying one of my summer classics. Green beans are in season now, so this salad is the choice of the day.

Al dente cooked green beans in a delicious vinaigrette made of grainy mustard, shallots and capers. Very nice.

Zutaten

  • 5oog green beans, stalk ends removed
  • 1 small shallot
  • 1 Tbsp grainy mustard
  • 4 Tbsp olive or rapeseed oil (or both)
  • 1 Tbsp white wine vinegar
  • 1 Tbsp white balsamico
  • 2 Tbsp capers
  • 1 Tbsp chives
  • salt & pepper

First trim the beans. You only need to cut of the stalk ends, if the tops don’t look too good, snip them off. Very long beans can be halved.
Put a pan of salted water on to boil. Once boiling, boil your beans until al dente (with a bite, a little bit squeaky). This may take from 4 to 10 minutes, depending on the size of your beans. Check after 4 min and decide if they are fine.
Vinaigrette für frz. BohnensalatWhile the beans are cooking prepare your vinaigrette.
Put the mustard, oil, vinegar and the capers in a bowl and mix very well to emulgate. Season with pepper and salt to taste.

Drain the beans well, then tip the cooked beans into the bowl with your dressing and toss everything together, making sure all the beans get coated. Have a final taste and top with the chives (I usually cut them with scissors directly into the bowl). Now enjoy.


französischer Bohnensalat

Gazpacho

GazpachoI still owe you this recipe. I already had that gazpacho last weekend, when it was so incredibly hot. It was perfect. A cold, spicy drink :-)
I prepared everything the evening before and let it chill in the fridge overnight. And everytime I opened the door of the fridge, I was looking forward to eating it.
And gazpacho is so easy to prepare.


Ingredients

  • 5 medium tomatoes
  • 1 red pepper
  • 3/4 cucumber
  • 1/2 small bunch of parsley
  • 500 ml tomato juice
  • 1/2–1 tsp tabasco sauce ( I used the chipotle version)
  • 4 tbsp red wine vinegar
  • 4 tbsp olive oil
  • salt & pepper
  • 1/2 small garlic clove (if you like raw garlic you can use more)
  • 4 tbsp basil leaves

Gazpacho im BlenderPut everything except 3 tbsp of the basil leaves in a blender and mix until you yield a smooth soup. Season with pepper and salt.
Chill in the fridge for at least 2 hours, then season again to taste.
To serve divide between your choosen bowls or plates, garnish with basil leaves and olive oil (if you like).


Gazpacho

Aronia-pear-smoothie

Since the smoothie yesterday turned out so well, I gave it another try with some other ingredients. Also very tasteful … and short ingredient list :-)

Ingredients

  • 1 big pear
  • 2 small oranges, or 1 big orange
  • 1/2 cup aronia juice
  • 1 small handful parsley
  • 1 small handful blackberries (I guess any other berry will be fine, or omit the berries)
  • 1 cup water (or same amount in ice cubes)
  • 1 Tbsp agave nectar or sweetener of choice
  • 1 1/2 Tbsp hemp seed

Put everything into your blender and blend well. Divide between 2 glasses and enjoy.

Aronia-Birnen-Smoothie

Aronia-Coconut-Smoothie

My neighbour brought me homemade aronia juice. Very interesting … I tried it first half and half mixed with water, but decided, that it might be better mixed with some other ingredients.
That’s how I came to the idea of making a smoothie.

Ingredients

  • 1 big pear
  • 1 small apple
  • 1/2 cup aronia juice
  • 1/2 cup chinese cabbage (I hope it’s healthy as well …)
  • 2 cups coconut-rice milk (I guess almond milk will be just fine)
  • 1 1/2 Tbsp hemp seed

Put all the ingredients in a blender, blend very well. Ready to drink :-)

Aronia-Kokosnuss-Smoothie

Mote con Huesillos

In Chile exists a quite strange drink. It is calles „Mote Con Huesillos“, which translates as pearl barley with peach. Sounds like a drink? Not really I guess. And it isn’t, but it also is.
It is a drink to drink, spoon and chew.

getrocknete Pfirsiche beim Einweichen
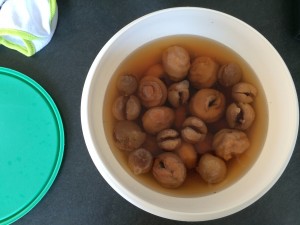
It consists of dried peaches and pearl barley, cooked in liquid, and eaten/drunken as soon as everything is chilled.
I found the original recipe in a chilean cookbook, but you can also find it on websites, e.g. here.
But I guess I did something wrong, because the ratio between solid and liquid ingredients just wasn’t right. What I got was kind of a soupy compote. Very delicious, but still not a drink.
So I changed the recipe a bit, cut down the amount of the barley and the peaches and now it works better.
I’ve never tasted the „real“ mote in chile, but I was told, that it tastes like it should taste.

The dried peaches, that you’ll need for the recipe may be hard to find, here in germany it is almost impossible.

If you have the same problem, feed free to substitute dried apricots. I found some really dry ones, not the chewy kind, and they worked very well. The dried peaches have the same consistency.

This time I used a mix of aprocots and peaches, because the peaches are so rare.

Ingredients

  • 125g dried peaches (or dried apricots)
  • 125g pearl barley
  • 50g sugar (e.g. brown sugar)
  • 1/2l orange juice
  • 1 cinnamon stick

Wash the peaches thoroughly and soak them in plenty of water for 24h. The peaches will expand a lot, so maybe you have to add more water.

PfirsichkompottWash the pearl barley, drain and bring to the boil in 1l water (use the rest of the soaking liquid) and the orange juice. Reduce the heat to a simmer and let it cook until the barley is tender. This should take about 30 min. Stir once in a while.

When the peaches are ready to cook, drain and reserve the soaking liquid.
Cut the peaches in 1/2-inch/1 cm pieces and put them in a pot, top with the soaking liquid up to 1 cm, add the sugar and the cinnamon stick. Bring to the boil, then simmer on low heat for 10 min.

As soon as the barley is cooked, mix the peach compote and the barley and let cool to room temperature. Now put everything in the fridge and chill for at least 2 hours, or until everything is nicely chilled.


Mote con Huesillos