Wild garlic and walnut pesto

It’s been a long time, since I posted the last time. I am sorry, somehow I could never find the time. But there are plenty of recipes I wanted to share with you. So today there’s a wild garlic and walnut pesto.

I guess the season for wild garlic is already over (typically me …), or maybe not? You can still try it next year :-)

This recipe comes together in a few minutes, and still tastes very good. Perfect for me.

Ingredients

  • 1 bunch wild garlic
  • 80g walnuts
  • 4 Tbsp Parmesan (optional)
  • olive oil
  • salt & pepper


Start with chopping the walnuts coarsely and toast them in a pan without any grease, stirring to prevent them from burning. As soon as the walnuts start to smell nicely toasted, take them off the heat and set aside to cool.

Wash the wild garlic and pat the leaves dry, as dry as possible. Place the wild garlic and the walnuts in a food processor and blitz a few times until you have a coarse mixture. Add olive oil, and blitz adain, pouring the oil as you go until you have your desired texture. I prefer my pesto quite runny, so maybe I use more oil, than others would. Now season with pepper ans salt, add the parmesan and blitz a few times again.

Pour the pesto in a clean jar and smooth the top. I poured a thin layer of olive oil on top, hoping this would keep the pesto longer fresh.
this pesto tastes very nice in the classical way with pasta and topped with parmesan. But you can also mix it into your salad dressing or pour it over roasted vegetables.


Pasta mit Bärlauch-Walnuss-Pesto

Dominosteine

Dominosteine are german christmas sweets. Normally they consist of three layers. On top there is a fruit gelee, no idea what flavour. In the middle there is marzipan and the bottom is gingerbread. And everything ist covered in chocolate. I prefer the dark chocolate version, because it is not so sweet.
Because I don’t like the gingerbread-base, I left it out in my version. It consists of two layers of quince cheese (membrillo) and one layer of marzipan in the middle. For this purpose the quince cheese has to be quite thin, so this time I spread it on a baking tray 3-4 mm thick. You can find the quince cheese recipe here.

Dominosteine


ingredients

  • quince cheese, about 20 x 30 cm, 3-4 mm thick
  • 100 g marzipan
  • 50 g icing sugar
  • 1 Tbsp rose water
  • about 170 g dark chocolate coating


Foto 13.12.15 13 38 43Knead the marzipan with the icing sugar and the rose water into a homogeneous paste.
Break the chocolate for the coating into pieces and start melting it in a water bath. But be careful not to let it get to warm. This seems to be the problem with my coating, it gets white marks.

Spread the marzipan evenly on the quince cheese, then cut it into strips of 15 mm. Cut again into quarters. Press two pieces with the marzipan-sides gently together.


Foto 13.12.15 14 07 46

Now you are almost finished. Use a brush to coat on all sides except the bottom with the chocolate. Leave to dry, then turn over and coat the bottom and any left out parts.

I think after one or two days they taste even better.

Princess cookie sticks

Here I am … again.
This year I am really deep into presenting you all of my favorite christmas cookie recipes.
Since I bought an attachement for my KitchenAid to make spritz biscuits, these are a regular around christmas. They are easily assembled and taste great. The name suggests to make cookie sticks, but I do as well little rounds or „S“ or whatever works.

Foto 27.11.15 20 18 06


ingredients

  • 125 g butter or margarine
  • 125 g vanilla scented sugar (I mixed a sachet of vanilla sugar with the „regular“ sugar)
  • 125 g ground, toasted hazelnuts
  •  250 g flour
  • 1/8 l milk
  • 100 g sugar (for the icing)
  • 75 ml water (for the icing)
  • 2 Tbsp rhum (for the icing)


Preheat oven to 150 °C.
It is a nice extra to toast the ground hazelnuts for these cookies, simply by toasting them in an ungreased pan over low heat, very carefull, because they burn really quick. You can also buy already toasted nuts.
To assembe the dough, beat the butter/margarine until light, then add all of the other ingredients and mix well. It will form a quite soft but strechy dough.
Spritz your cookies and place them on a lined baking sheet and bake for 25 min on the middle rack.
They will not colour much, I guess you can let them longer in the oven if you prefer.
As long as the cookies are in the oven, prepare the cooked icing.
Place the 75 ml water, the 100 g sugar and the rhum in a small saucepan and simmer, stirring occasionally, until all the sugar has dissolved.
Right after taking the cookies out of the oven, brush them with this icng, and let dry very well.

I have to apologize, I only made this one photo so far …

lemon cookies

And there we go. The second cookie recipe for this winter.
This one is a tradition in my best friend tines‘ family. And in all the years we shared an apartment, there were always a lot of these delicious sweet-sour cookies around at christmas. So I missed them since then, and last year I got the recipe, which I share with you right now!

Zitronenkekse


These are Spritzgebäck. Right now I don’t know the english word. But Leo suggests spritz biscuits. I don’t own a pastry bag, so I used a freezer bag and cut one edge off. Worked just fine.

ingredients

  • 150 g butter or margarine
  •  200 g flour
  • 1 egg/egg-replacer (I used 1 Tbsp joghurt, 1 Tbsp corn starch, 1 Tbsp soja flour, 2 Tbsp water)
  • 250 g icing sugar
  • juice and grated peel of 1 lemon


Preheat oven to 175 °C. Mix butter/margarine with the lemon peel and 125 g of the sugar until light and fluffy. Now add the flour.
Pipe this dough on a lined baking sheet, but leave enough space between the cookies, because they will flatten a bit while baking.
Like I wrote above, I used a freezer bag, cut the edge off, about 4mm. That worked really good.

IMG_8605Bake them in the oven on the middle rack for 15 min until golden. Meanwhile prepare the lemon icing with the lemon juice and the rest of the icing sugar.
As soon as the cookies are ready, start icing them with a brush, I „painted“ them 2-3 times. Let dry completely before moving them to a cookie jar.


„Luisa“-Triangles

Plätzchen-season starts NOW!
Last year I completely failed at posting my „Plätzchen“ recipes in time, so I didn’t do it at all. But this year I started early enough, so you maybe you want to try one or two of my favorites.

This recipe is originally from a baking powder or vanillin sugar sachet. I collected a lot of these and stored them in my recipe book. The book smells very good now. And it also happened, that I tried some of these recipes. This one is a regular for me, and usually the first cookie recipe I bake for christmas.

Luisen-Dreiecke


Last year my cocoa was out, so I topped it up with carob. One of these ingredients I HAD TO BUY, but never know, what to do with it exactly. The cookies are delicious one way or the other, with the cocoa-carob mix I suggest or only with cocoa, so feel free to do it the way you want.

ingredients

  • 125 g butter oder margarine
  •  250 g flour (type 405 or 550)
  • 1 tsp baking powder
  • 15 g cocoa
  • 15 g carob or cocoa
  • 1oo g sugar + ca. 3 Tbsp extra
  • 1 packet vanilla sugar
  • 2 Tbsp rhum
  • 3 Tbsp water

Luisen-DreieckePlace the cold butter/margarine in a mixing bowl and top with the dry ingredients (flour, sugar, cocoa/carob, baking powder) and cut with a knife the butter/margarine into small pieces, while mixing in the dry ingredients.
Now add the liquid ingredients and knead either with your hands ot the dough attachement on your food processor, until everything is incorporated. I usually have to knead a little bit with my hands in the end to get the best results.

Let the dough sit in the fridge for 30 min, while you preheat you oven to 190°C.

Roll your dough into one or two sausages with 3 cm diameter, and either kepp them that way or do it the way I do nowadays, and create a gigantic triangle-sausage. Roll in the 3 Tbsp of sugar, using more if you need.
Cut the sausage into 7 mm slices and put on a lined baking sheet. Bake for 10 minutes.
That’s it. Delish.


Cheesecake-coconut ice cream

Already two years ago I bought an ice cream maker for my KitchenAid. I love ice cream, so I thought, it would be lovely to make it for myself.

Starting my research for interesting recipes, I was really stunned, that most call for 10 egg yolks. I instantly knew, that I would never make one of these recipes. So I didn’t use my ice cream for almost one year. Then I tried a few recipes with cream and fruit, but I still wasn’t completely happy.
This summer I started a new research and found some very interesting recipes, using coconut milk instead of cream, and I had to try this. A few tryouts later I found the perfect ice cream base for me. It is this recipe from Ashley from edible perspective. I added a few things to create the cheesecake flavour.

Ingredients

  •  2 cans coconut milk (NOT light!!)
  • 1/3 cup brown rice syrup
  • 1/3 cup raw cane sugar
  • 2 tbs natural vanilla flavour
  • 1 Tbsp arrowroot starch
  • juice and zest of 1 large lemon
  • 1 1/2 Tbsp Vodka
  • 1 pinch salt
  • 2-4 cookies (I used Digestive)
  • compote from blackcurrants (optional)

The ice cream mixture should be really cold when putting it in the ice cream maker, so it makes a lot of sense, to prepare the mixture the day before you make the ice cream. Also you have to put the bowl for your ice machine into your freezer.

So the day before, pour the coconut milk into a saucepan, take a few spoons aout and mix them thouroughly with the arrowroot starch, then pour back into the saucepan.
Add all the other ingredients: the lemon juice and zest, the vanilla flavour, the sweetener and a pinch of salt. Bring to a soft boil, stirring occasionally and let boil for about 5 min. It should thicken a bit. Let cool to room temperature, stir occasionally to avoid forming a skin. As soon as it is cool, add the vodka and transfer to a bowl that fits into the fridge. Cover the surface with clingfilm, again to prevent a skin, and put in the fridge.
If you want to use a black currant compote, just cook 2 handful of blackcurrants with 2 Tbsp of sugar until soft, breaking the berries with a spoon. The day after, prepare your ice cream maker, pour the mixture into the bowl and start churning. As soon as your ice cream is finished (mine takes usually 25 min) add the crumbled cookies and churn one last time. Transfer to a container that can be frozen.
If using the blackcurrant compote, pour a few tablespoons on top and swirl them with a spoon or a knife. Smoothen the surfacer and press clingfilm on top. This prevents ice crystals from forming. Cover with the lid and freeze for 4-5 hours.If you want to eat the ice cream, you should take it out of the freezer a few minutes before, then it is better scoopable.

Käsekuchen-Kokosnuss-Eis


vanilla icing sugar

VanillepuderzuckerLast weekend I made a very tasty redcurrant-cheesecake from this website vegan-und-lecker.de, and I needed the seeds from one vanilla pod. I was always very unhappy with throwing away the scraped out pod, so I usually keep it to cook it whenever there is milk and something sweet involved, with the milk.
Sometime ago I thought of making my own vanilla sugar. I put the vanilla pod with some sugar in a blender and out came vanilla flavoured icing sugar. Nice!
Easy and versatile, as I like it. But to call this a recipe is mere exaggeration …

ingredients vanilla icing sugar

  •  1 scraped out vanilla pod Vanilleschote
  • 1 cup sugar (ideally light cane sugar)

IMG_7744Simply put the sugar with the pod in a blender an bland it until the vanilla pod ist almost completely dissolved. I like to have a few small crumbs left in the powdered sugar.
You will need to shake the blender a few times, so everything can mix well.

I would love to try it out with less sugar, but it doesn’t work in my blender, so I guess I will have to add a second vanilla pod sometime.

Great whenever vanilla sugar is asked for or on waffles and everything sweet you want to add a subtle vanilla flavour.

Globe artichoke with two dip sauces

globe artichokeMy parents grow globe artichokes in their garden, and this year I am here at the right time, to catch some of these.
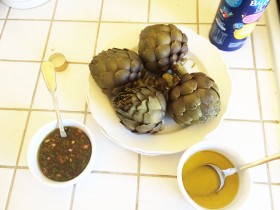
I usually prepare them in a very classic manner, only with vinaigrette. My boyfriend prefers his with a simple lemon and olive oil dip. So I give you both recipes.
I was a little bit shocked to see how many vine louse (Blattlaus) lived in the artichokes, would have never guessed that. And while I thought I did a good job washing them all away, while eating the artichokes, I saw, that I didn’t :-)
Well, they were still delicious.

So this is how I eat globe artichokes:

ingredients globe artichokes

  • 1 big Globe artichoke per person (or 2 smaller ones)
  • 2 Tbsp (red wine) vinegar
  • salt

artischocken im kochtopf
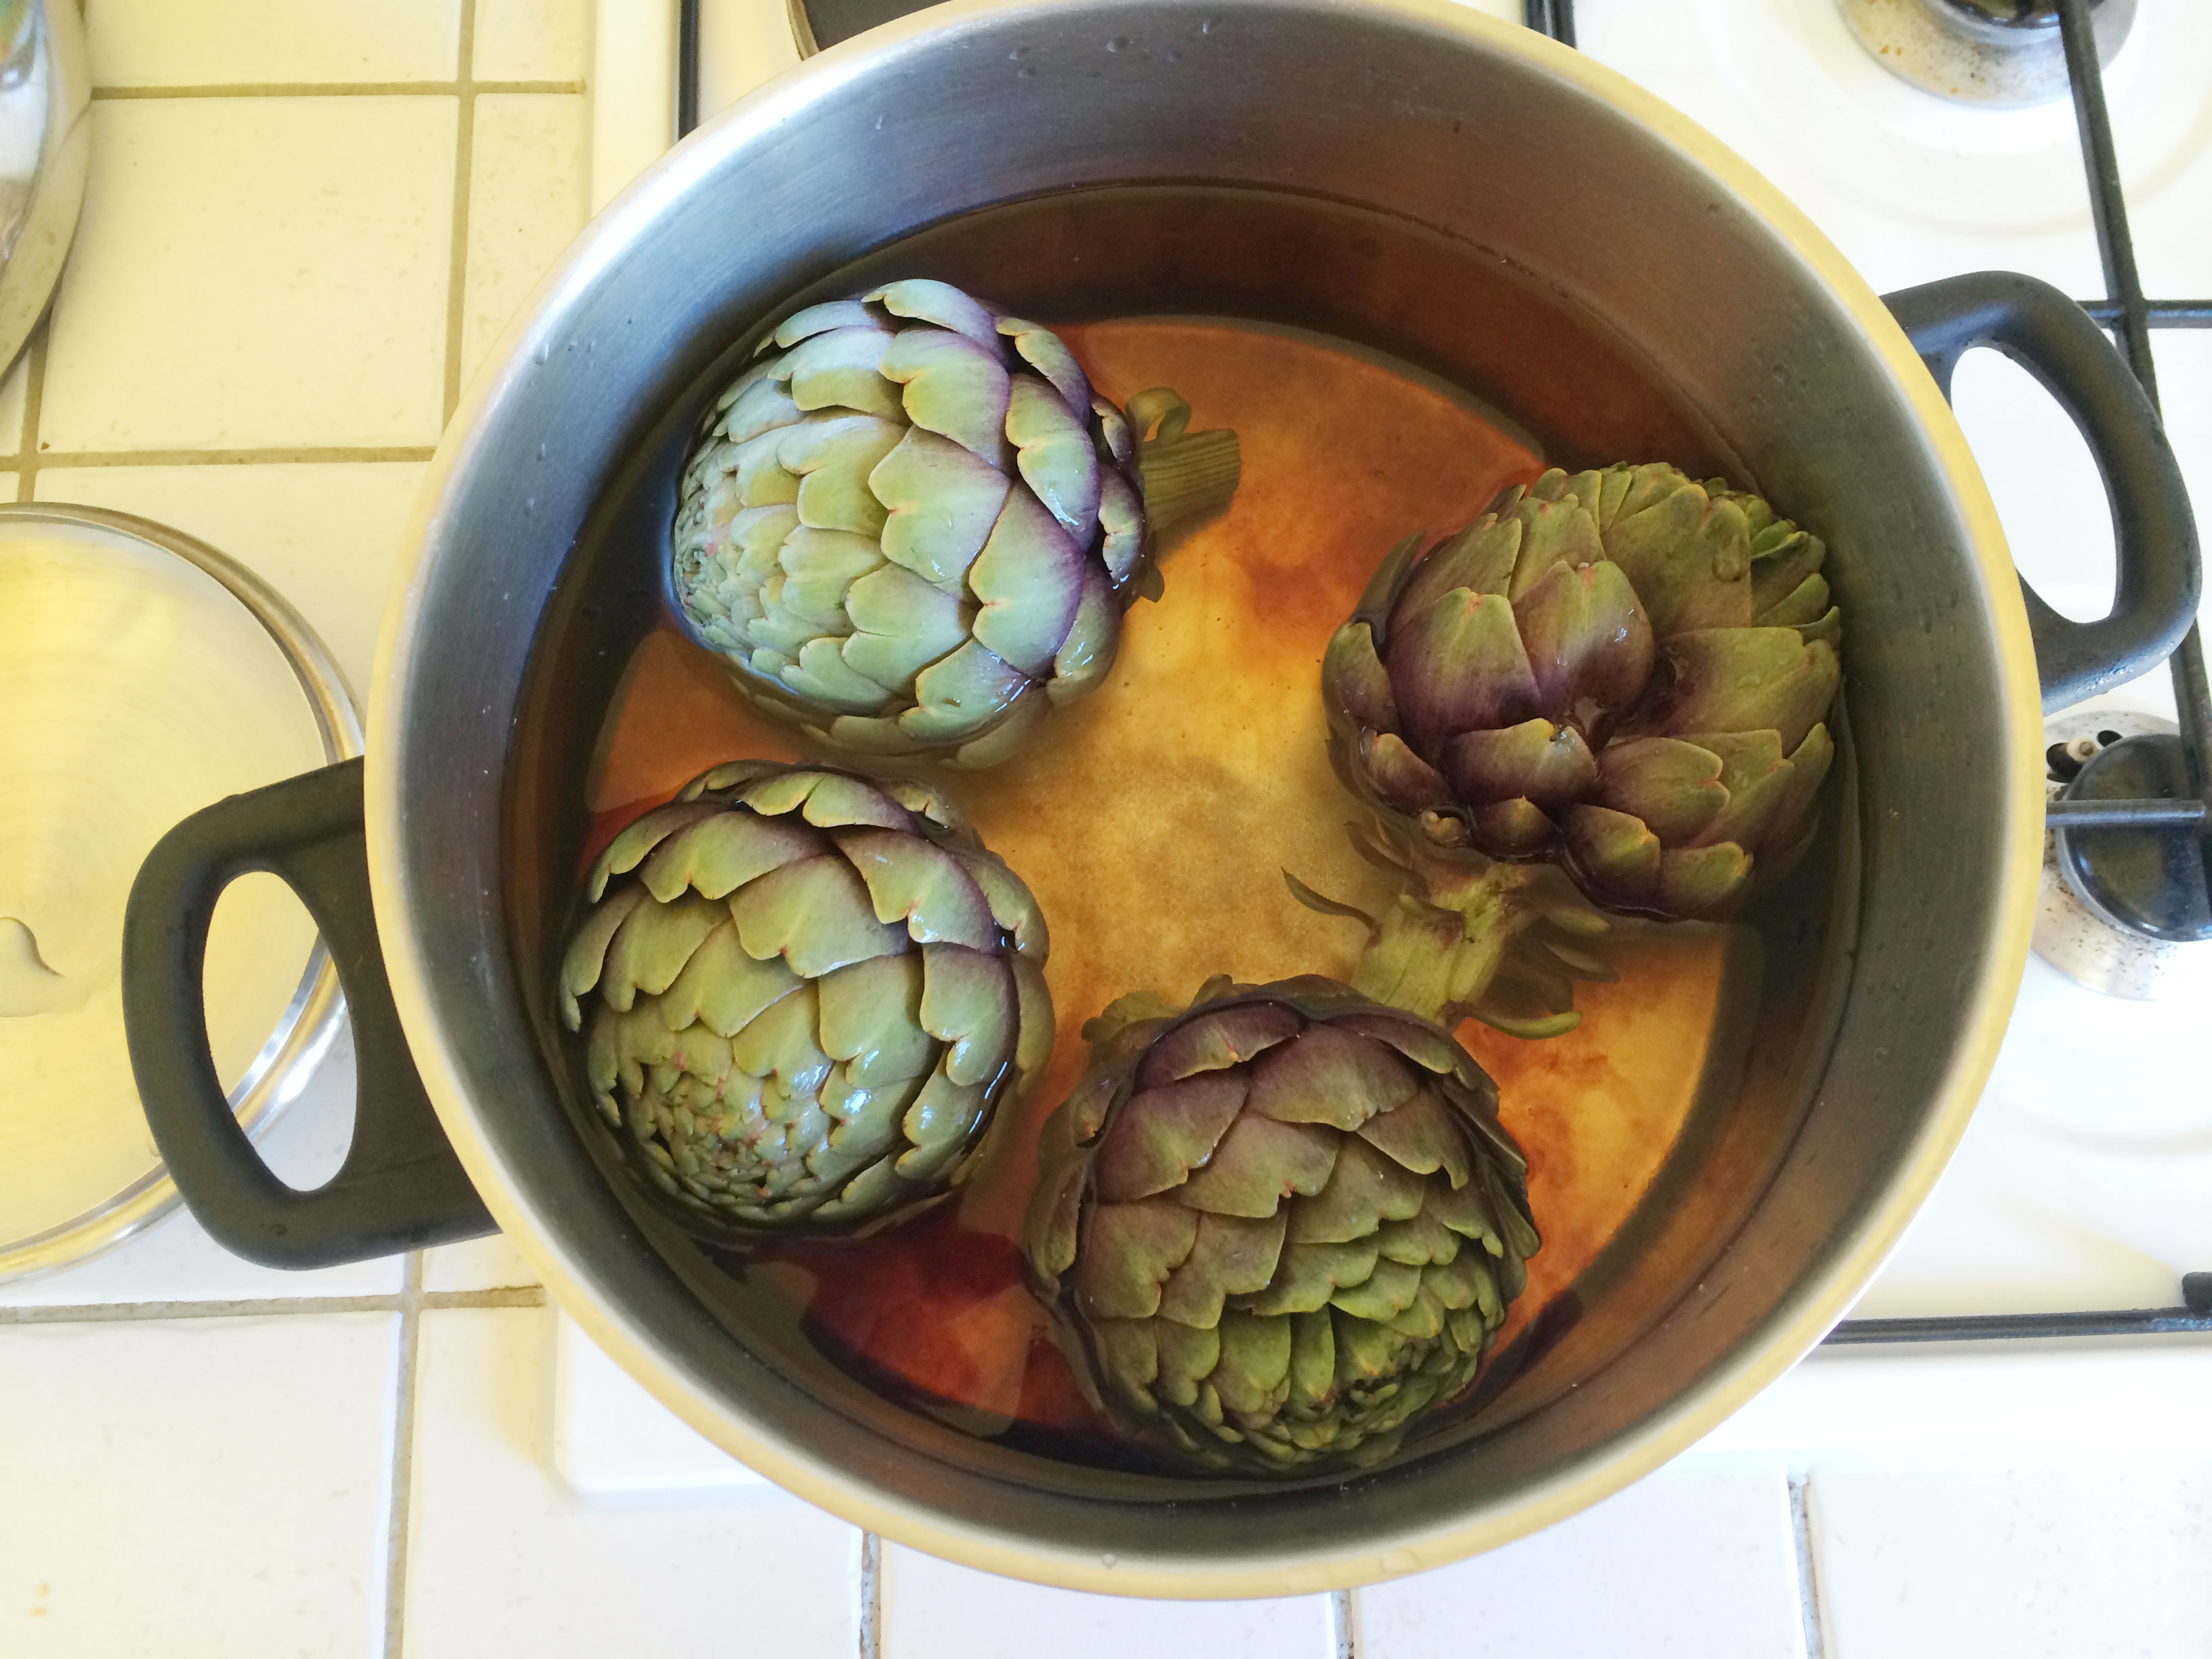
My mother taught me to cook the artichokes in salted water with a lithe vinegar. I have forgotten, or maybe never asked, why, but I follow this rule, and I guess it changes the flavor, so that’s how I like them. Do you happen to know, why there should be vinegar in the cooking water? Please share.

So I put the washed artichokes, stems trimmed to 2 cm, in a big pot and cover them with cold water. Add salt and vinegar and turn up the heat. As soon as the water is boiling, turn down the heat and ket simmer for at least 45 min. Depending on the size of your artichokes it will be more likely an hour or so until done.
Turn them after 20 min and check if there its still enough cooking liquid, if not, top with boiling water.
After 40 min you can check the first time, if the artichokes are ready. Tear one leaf from row 3, don’t take the outer leaves, because they are tougher and this will lead to overcooked artichokes. If the leaf comes off easily, the artichokes are ready. If not, go on cooking them, and check every 15 min.
Don’t be disappointed, if you don’t get the perfect cooked artichoke the first time. I over and undercooked mine a lot of times, and still so …
If you think, they are done, scoop them out of the cooking liquid (attention, very hot, don’t use your hands, like I tend to do …), but reserve the liquid, because, if they happen to be too hard, you can easily put them back and go on cooking.
Put them on a plate and transfer tot he table.

And here are the two different sauces I prepare:

ingredients vinaigrette

  • 6–8 Tbsp olive oil
  • 4 Tbsp balsamico
  • 1–2 Tbsp red wine vinegar
  • 1 small shallot, finely chopped
  • 1 Tbsp parsley, finely chopped
  • pepper & salt

Top the minced shallot with a pinch of salt and the vinegar and let marinate for a few minutes. If you only have balsamic, you can leave out the wine vinegar. In that case, my mixture is 1:1 with the olive oil. I like my vinaigrette to be quite sour.
Mix in the parsley and olive oil, season to taste worth a generous amount of pepper and salt.

ingredients lemon olive oil dip

  • 4 Tbsp freshly squeezed lemon juice
  • 4 Tbsp olive oil
  • pepper & salt

This dip is very simple. Just mix olive oil and lemon juice and season to taste.

And now all you have to do is, to dip leaf after leaf into your desired sauce, scoop a bit out and scrape the flesh off with your teeth.

globe artichoke


jelly bear cake

GummibärchentorteThis is THE family classic for me! My mother invented this cake for my birthday, I cannot recall that she baked it for my brother, but I can remember it for as long as I can think for my birthdays. It is also in a lot of birthday photos.
I started baking it for myself a few years ago, because I missed it. And because I like a good tradition.
It is not a typical butter-cream cake, picture a fresh, fruity curd between sponge layers, topped with delicious vanilla whipped cream.
Right! Yummy.

Ingredients „Wasserbiskuit“ (translates water sponge)

  • 5 Tbsp water
  • 5 eggs
  • 300 g sugar
  • 250 g flour
  • grated zest of a lemon
  • a pinch salt

This recipe is from a cookbook for cooking and domestic science schools from 1925 that my grandmother gave me. You can find  recipes like „war biscuits“ and „bread water“ in there. Awesome.

Preheat the oven to 140 °C. Divide the egg yolks from the whites.
Mix the yolks with the water for 3 min, then add the sugar and mix until light and fluffy.
Beat the egg whites with a pinch of salt until they form firm peaks.
Fold the (sieved) flour and lemon zest and the egg whites under the sugar-yolk mixture until well combined.
Pour into a greased 28 cm cake tin and bake for about 1 hour at 140 °C.
It took a little longer this time, so check with a wooden skewer, if the sponge is done. I think I will try 150°C next time.
Take the cake tin out of the oven and let it rest for about 10 min before removing the sponge carefully from the tin.
Slice it once horizontally and let cool completely.

This step can be made a day ahead.

ingredients filling & vanilla whipped cream

  • 300 g mixed frozen berries (raspberries and blackberries with some red and black currants works best for me)
  • 5–7 Tbsp raw cane sugar
  • 400 g curd cheese (20% fat)
  • 1 packet vanilla sugar
  • 300 ml whipping cream
  • 3 packets vanilla sugar or 3 Tbsp home-made vanilla icing sugar
  • 1 packet jelly bears (I recommend the vegan ones, because they are softer) or fresh berries

Thaw the frozen berries for about one hour. If they produce very much juice, strain them. Mix with the curd in a bowl, and add enough sugar until you get a fruity but not to sweet filling. Your sponge ist quite sweet, and also the whipped cream, so be easy on the sugar.
Spoon half of the filling on the bottom half of the sponge  and add enough to cover it, it can be about 1 cm thick, but shouldn’t run down the sides. There will be some filling left.

IMG_7058Top with the upper half of the sponge. If it get’s messy, like it happend with my sponge this time, everything broke in pieces. Don’t worry. It still tastes the same and after decorating with the cream, no one can tell a thing.

If you don’t want to eat the cake straight away, put it in the fridge, and proceed with the whipped cream right before serving.

Put the cream and the vanilla sugar in a mixing bowl and whip with medium speed with a handheld or stand mixer. I recently read an good article about whipping cream here: www.thekitchn.com.
Spread the whipped cream with a spatula carefully all over your sponge. I guess there will also be some whipped cream left, but no worries, it tastes very good all on it’s own, direktly from the spatula.
Finish with decorating with the jelly bears, fresh berries or whatever you like.
This year I had to buy jelly berries, because no bears were available, but it was still nice, but I guess I have to deliver a photo of the „original“ cake someday.

IMG_7061

Tarragon-Aspargus-Salad

The season for white aspargus is about to start.Yeeeah!
It can happen, that I eat white aspargus twice a day, that’s how much I like it.
Today I bought aspargus for the first time in 2015, only a small bunch, so I had a nice salad with roasted aspargus on top.

Ingredients Salad

  • 6 spears white aspargus
  • 1 Tbsp olive oil
  • 1/2 bowl mixed salad leaves, respectively rucola, lammbs lettuce, radicchio
  • 4 sprigs tarragon, bzw. a small handful
  • 2 cherry tomatoes
  • pepper & salt

gebratener SpargelPeel the aspargus and snip off the ends. Cut the stalks diagonally into 7 mm pieces, keep the heads intact.
Heat the olive oil in a griddle and roast the aspargus for about 10 min. When the pieces begin to colour, add the heads and roast for about 4 min.
Wash the salad, if the leaves are too big, rip into 2–3 cm pieces. Pick the tarragon leaves off the stems, wash with the salad and spin or shake dry.
Depending on size cut the tomates in four or six pieces.


Ingredients Vinaigrette

  • 6 Tbsp olive oil
  • 4 Tbsp balsamico
  • 1 small shallot, finely chopped
  • 1 heaped Tsp jam/jelly, if possible raspberry or elderflower
  • 1 heaped Tsp whole grain mustard
  • pepper & salt

Mix the finely chopped shallot with the olive oil, balsamico, jam and mustard, until everything is nice and smooth. Season with pepper and salt to taste.

To assemble the salad, first layer the salad and tarragon leaves in a large soup bowl, add the tomatoes and pour over as much dressing as you like. I prefer mine quite soaked. Top with the aspargus and grind some more pepper on top.

If you haven’t tried the combination of aspargus and tarragon: it is heavenly!!

Salat mit gebratenem Spargel